Monday, February 28, 2011

Q and U Get Married


Yes, after years of going together, this morning in my son's kindergarten class they made it official.....Q and U got married, so now they will go together for life :o) !! You can imagine how honored I was when they asked me to make the wedding cake!! But then I had to decide what to make?? I decided to go with cupcakes, because I have done enough school parties to know that it is MUCH easier to serve cupcakes (this way you don't have to worry about cutting and serving, and also the kids don't need forks). I wanted to come up with something that was sorta elegant and wedding looking, but that was also still colorful and fun for kids. So, it all started with my Cake (or rather cupcake) Topper. I wanted a bride and groom, but Q and U were no ordinary Bride and Groom, and since I could not find a Q and U wedding topper, I had to make one of my own. I simply took craft Q and U (made out of foam) and attached them to a wooden stick. I thought about attaching eyes, but decided that was to much. I then happened to find a wedding dress and tux that were for champagne bottles, and decided that they would work perfect. I also bought a small flower stem to be Q's headpiece. After that I simple put the rods down in my cupcake stand. Here is a picture of the toppers:


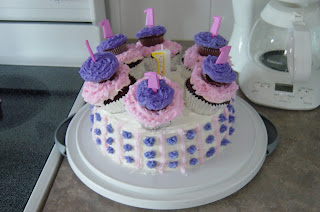
I then used the pink and the green color scheme as my theme for my cupcakes. Since the letters were glittery and sparkly, I got pink and green colored sugar so that they would be glittery and sparkly. I baked 4 dozen cupcakes and then iced them with white icing. I then went back and sprinkled pink hearts and green hearts on them. Then after setting the cupcakes on the stand I placed a few flowers on the stand, just to dress it up. Here is
the finished project:

Here is a picture of Q and U with the Wedding Cupcakes. I think they look happy:

And here is my FAVORITE kindergartner of all, with one of his good buddies, enjoying their cupcakes:

Thursday, February 24, 2011

Pretty Moon Pies


Who doesn't love a Moon Pie and an RC Cola?? Okay, honestly I do not care much for Moon Pies, and I had never heard of Moon Pies and RC Colas together until I made these for my sons preschool a couple years ago. But at any rate, if you like Moon Pies you will love these. Even if you don't like Moon Pies you will probably like them (if not for eating, just for looking at, because they are super cute!).

I have to be honest and give credit where credit is due...My Mom actually taught me how to make these, and I am pretty sure that she got the idea from Southern Living, but they are too cute not to share.

I have made these quite a few times, and every people rave about how cute they are. The nice thing is that they can be decorated for any occasion by switching out your decorations. I have made them for Christmas (as seen), Valentine's Day, Thanksgiving, and as party goodies for one of my son's birthdays. Covered with a clear wrap and tied with a matching ribbon (sorry I don't have a picture of this) they look great.

Now let me tell you how simple they are to make. You just take a moon pie (the big ones work best, but you could use the smaller one also) and stick in a long lollipop stick. You then melt down the Wilton colored chocolate melts (these can be bought at Michaels, Hobby Lobby, or any cake baking store) in whatever color(s) you want to use. You want to melt them in a candy decorating bottle (which can also be bought at said stores). Once the candy is melted you simple drizzle the chocolate over the moon pies in whatever pattern you want, and stick your candy on (using the melted chocolate). Then you simply let them dry and cover and wrap. So simple, but so pretty!


Tuesday, February 22, 2011

Fun Kids Space


When we moved into our new house a year and a half ago we were so excited. I had all kinds of fun new decorating ideas I could not wait to dive into!! One of the things we really liked about our house was the definition of space. Our room is on the main level, and the kids rooms and bathrooms are upstairs. There is even an extra bedroom between their rooms that works perfectly for a playroom (since we already have a guest room in the basement). While it took me a little while to adjust to our rooms being on a separate level from the kids at night, it did not take me long to adjust to the kids having their own space upstairs. Meaning gone are the days of my kids having my family room covered in toys! So, back to my decorating ideas. I had big plans for my new house...except this hallway!! What was I going to do with this space? It separates my kids rooms, and across from it is the play room. The wall is over 13 feet long, with no breaks in it, behind it is the staircase to the attic. I thought of doing a family wall, you know hanging lots of pictures of the kids at various ages, with maybe some type of writing. I thought about having my friend Lisa paint a huge mural (she does such awesome work...I will use a blog on another day the show what she did in our pool bathroom). I also thought of getting pictures (or maps) of the 4 parks in Disney World (we are HUGE Disney fans in case you did not know), and having them blown up, then framed and hung in the space. And while I liked all these ideas, I was not completely sold on any of them. Then one night when I was laying in bed the idea hit me out of nowhere. I had always wanted to do a chalkboard wall, but could never find the right space. Well, this was the right space for sure!! So, I ran to Lowe's that day and $13 later I had my quart of chalkboard paint. Such a easy and inexpensive idea!! Now I will tell you that as I started to paint I did panic a little and think to myself, "Oh my Gosh! I just painted my wall BLACK!" But I decided it was worth it. After I finished painting the bottom, my wonderful husband hung a piece of molding for me, which I caulked, and then painted white to match my base and crown molding.

Now, what to do with the top?? I decided to let the kids make the art for up there also. I found a ribbon that I liked, and then bought just plain white canvases (in a small size), and painted them to match the ribbon. Once they had dried I simply glued the ribbon onto the back, and then let my kids paint them. They had lots of fun, and it helped to make the space more "Their Space". Here is how it turned out:


The kids were SO excited, and all their friends love coming over, and drawing on the wall. Such a great rainy day activity :o) !! But I still had one more problem. I had a wall across from it that backed up to the playroom, and was about 10 or so feet long. What was I going to do with it? I decided to stick with my "Art" Theme. You know all that art work you kids bring home from school? Mine bring lots home, and I love it all. That is what gave me this idea. I bought a corkboard for each of them, and glued the same ribbon that is on the canvases to the back of the corkboards and hung them. Let me clarify...I did not actually use the ribbon to hang them. I used the metal hooks on the back of the corkboards, and just hung the ribbon for decoration. Here is a picture of how they turned out:


And here is a picture looking down the hallway. Oh, and FYI the plate holder holds 2 plates that my grandmother made for each of the kids after they were born. I had been trying to decide for years what to do with those plates, and this seemed like the perfect spot for them.

I really like how it turned out, and I especially like how much my kids love their new space :o) ! Chalkboard walls are an easy and inexpensive (Not to mention fun!!) way to decorate a kids space.

Saturday, February 19, 2011

First Birthdays

Since I seem to have babies on the brain for some reason, I decided to take a walk down memory lane and share my kids first birthday cakes with you. First, I must admit that I am not super proud of either of these cakes, as both were my first attempts at baking and decorating cakes. But if you can use either idea, than great :o) !!

My daughter's first birthday party was pink and purple themed, and this is the cake that I baked for the occasion.

All I did was bake two round cakes and stack them together with icing. For this cake I used red velvet with cream cheese icing, since this was the cake that the adults at the party ate. I then baked a dozen cupcakes in chocolate, and I used the rest of the batter to make mini cupcakes (I can't remember exactly how many I had). Once the cupcakes were cool I iced the regular sized cupcakes in pink, and the mini cupcakes in purple. After that I simply stacked 6 regular cupcakes on top of the cake using toothpick to help hold them in place. And then on top of those I stacked 6 of the mini cupcakes, again using toothpicks to help hold them in place. After that I topped them off with some "1" picks, and iced the sides of the cake to match the cupcakes. I think for my first cake decorating attempt it turned it okay.

Here is a picture of my sweet baby girl enjoying her first cake


Now for my son's first cake. His party colors were blue, red, and yellow. His cake was a little bit harder for me. I rented a "1" pan from a local cake shop, and baked a chocolate cake in it...simple enough so far. Once the cake cooled I decorated it (that was the tricky part for me). I don't know if you can see the "1" in the decorations behind the cake, but that is what I was going for. I iced the cake in a blue to match the blue in his decorations. I then piped yellow around the edge to look like stitching (again, trying to match the 1 in his theming), next I did a decorative edging in red around the border (again, trying to match the"1"). Lastly, I wrote his name in red going down the cake.
Again, I did not totally love how it turned out, but as you can tell my son REALLY enjoyed it, and isn't that what matters most ;o) ?


Monday, February 14, 2011

My thoughts on Valentine's Day and my Husband

Valentine's Day..... Chocolates, Flowers, Cards, Jewelry. While I had a wonderful day with my husband and children (and my Mom who is in town for the week), I have to be honest and say that it is not one of my most favorite holidays. While I love the idea of spending a day telling those you love how much you love them, I don't think you should only do this on Valentine's Day. I guess I feel like I would rather my husband bring me flowers just because he loves me, and not because a day on the calendar says he should. And lets be honest, if he brought me flowers on any other day of the year he would pay about half the price ;o) ! At any rate, since I have the most awesome husband I wanted to do something special that let him know how much I love him. So, I made him this video:


When I sat down to make this video I thought to myself, "This video is 3 minutes long. How in the world am I going to find 3 minutes worth of reasons that I love my husband?" But the thing was I actually needed a way longer video!! Anyone who know my husband will tell you what a great husband he is to me, and a great dad he is to our children, but there are truly SO MANY things I love about it. After almost 14 years of marriage, I can easily say I love him more now, than I did on the day I married him. We have so many memories together..some good, some not so good, but either way they are part of our history. They are what make us the couple we are.

I remember shortly after I was married, I had a friend who was single ask me about being married. I told her that I thought being married was like having a slumber party with your best friend every night. And while our lives have changed a lot since then (His job is more demanding, we have added a couple children, and we have lots more responsibilites) I still pretty much feel that same way. I look forward to our time together every day. We put the kids to bed, and then the rest of the evening is ours. Sometimes we do something really fun, but most of the time we just hang out watching TV and talking, and it is my favorite part of the day.

Is being married always easy? No. I heard Dr. Gary Chapman say once that love is a choice, not a feeling. And I believe this to be true. I wake up each day and make a choice to love my husband that day. Most days this is a very easy choice. Some days this is a tough choice, and I have to really pray for God to give me that love (which He always does). On those days I also have to remind myself that I am not always the easiest to love either, and that I am sure my husband prays A LOT ;o) !

So, basically on this day I want to say how thankful I am for the wonderful husband that I have, and how I cannot imagine my life without him in it.

Sunday, February 13, 2011

Valentine Cupcakes

I am half way done icing the cupcakes for my daughter's school Valentine Party tomorrow, but I decided to take a break and show you what I am making (I know you have all been waiting on the edge of your seat ;o) !!). So, here they are:


They were super easy to make. I just baked heart cupcakes (I used some silicone shaped hearts I bought at Target a couple years ago. I think they are about $8.00 for a dozen). Once they had cooled, I iced them with pink icing. I placed a candy heart (the type you use to decorate cakes or cookies) in the center. You could really use any type heart (chocolate or whatever), but I thought these added a touch of color. I then took white icing, and using a star tip, piped it around the edge. This emphasizes the heart shape. Again, you could use any color (red would also look nice). Very simple! Here is a close up:


Saturday, February 12, 2011

Valentine's Party

Any of you who know me, know that I have been busy coordinating for my daughter's school. Valentine's Party on Monday. Here is what I have put together. I am bringing the paper products, so I decided to also make little take home goodie for each of the children. We will set them at each child's seat, so they will also look pretty as a table decoration while they enjoy their snack.


I did not want to spend a fortune on goodies, but I also wanted something that would look really cute, so this is what I came up with. I took a simple red plastic cup, and glued a decorative ribbon to the top (I found this ribbon on clearance at Michael's for like $.50 a spool). I then wanted to put some type of scripture on the cups, and I decided on 1John 3:18. I think it fits perfect. I then printed it out on my computer, and cut it into a heart. I glued it to the center of the cup. I then put white glitter dots all over the cup. I think they turned out pretty cute, and they were very simple (and inexpensive!). Inside the cups I baked Valentine's Cookies (just the really simple pre-decorated, pre-sliced kind), and put them into a small cookie bag, and tied it up with a small red ribbon. I also put in a pencil, a heart eraser, a heart lollipop, and 2 small chocolate hearts.

I also decided at the last minute to add another game (another Mom is already bringing one game). Again, I wanted to keep it simple, so I decided on Valentine Bingo. For those of you who don't know, this is a wonderful site www.dltk-kids.com They have lots of great craft ideas. Anyway, you can go to their website and print BINGO cards for any occasion. You just put in what you want, and it prints them. S-I-M-P-L-E !! I went with Valentine's Pictures (of course!!), but I also added the kids spelling words for next week, so that it could be a little bit educational ;o) ! The kids will use the conversation hearts as their place markers, and when the game is over they can have them for a little snack. Here is how they turned out:


And here is a close up:


All I did was print out the Bingo Cards, and mount them on red and pink card stock. I had a little bit of ribbon left from my cups, so I laced it on the top for decoration. I then added a few heart stickers. And done.

Tomorrow I will be baking cupcakes for the party. Stay tuned to see what I will be doing.....

Thursday, February 10, 2011

Teddy Bear CUBcakes

I have made this cupcakes twice, and they have been a hit each time! The first time I made them was for my daughter's 4th birthday. She had a Build A Bear Party, and they went with the theming perfectly. Then last year her class was called the Bear Cubs, so at the end of the year I made them for her class. They are so cute, and very easy to make.

All you do is make your cupcakes (any flavor is fine, but chocolate works best). You can either make cupcakes from scratch or use a box. Here is a hint: If you use a mix, add milk instead of water. It makes your cupcakes much more moist, and more homemade tasting (thanks to my wonderful Mom for teaching me that trick ;o) !). Then ice them whatever color you want your bear to be. I have used chocolate both times, but white would also be cute! Once they are iced add 3 Nonpareils to each cupcake. Put two in the top (pushed far enough down in that you only see half of it), and then put 1 a little lower than the center of the cupcake. You can then use either 2 M&M's (in any color) or 2 Chocolate Chips, or I just simply used 2 dots of black icing (because I did not want my bears eyes too big). You then draw on the mouth with the black icing, and put a Red Hot Candy at the top for the nose. Then add a few Chocolate Sprinkles at the top for it's hair, and you are done. See very simple, and a hit with kids every time :o) !!


Wednesday, February 9, 2011

Teacher Appreciation Gift


Alright, before I can start showing you all the wonderful new things I am up too, I need to back pedal and show you some of my older ideas. Since Teacher Appreciation Week is next week (or at least is for my kids school), I decided to share with you a gift I made for my son's teachers a couple years ago. I was room mom in his class, and needed to come up with an end of the year gift from the class. So, this is what I made for his teachers:


Anyone who knows me well, knows I am all about personal gifts. I mean gift cards are great, but I also like to give gifts that have a
meaning...especially when it comes to the wonderful staff at my kids school!

Basically I just took plain terra cotta pots, and one morning before school I got each of the kids thumbprints (in yellow paint), and then wrote their name below it. Once the paint had dried I turned the thumbprints into little bumblebees. I then added some flowers and hearts to the pots, and personalized it with the teacher's last name.


Once it was all dry I planted a small bush in each one. I asked parents who wanted to contribute to bring a gift card to one of the teachers favorite stores or restaurants, and we then hung them with ribbon. I think they turned out pretty cute :o) ! This way the teachers got lots of great gift cards, but they also got a way to remember this class. Here is a close up of the pots:

My Mom's Delicious Chocolate Chip Cookies

For Holly:

1 Cup Butter (My Mom uses 1 stick butter and 1 stick margarine)
3/4 Sugar
3/4 Brown Sugar
2 Eggs
1 1/2 tsp Vanilla
2 1/4 Cups Flour
1 tsp Baking Soda
1/2 tsp Salt
12 oz Chocolate Chips (I like to use Ghirardelli Chocolate Chips)

Cream Butter and Sugar until fluffy; Beat in eggs 1 at a time; stir in vanilla; gradually stir in flour, baking soda, and salt. Add Chocolate Chips. Chill for several hours. Bake at 375 for 8-10.

Enjoy :o) !!

Welcome to my Wonderful World of Blogging!

Okay, I have decided to jump on the band wagon, and start a blog. As I sit down creating this blog it occurs to me that maybe no one really wants to read what goes on in my imagination (trust me, I understand...it is a scary place in there!), so I will spare you most of what goes on in there. I am creating this blog as a place to share all my crafts. Whether it be the yummy cupcakes I love to bake for my kids school, or the crafts I make for their classes, or the latest interior design project I am working on. Okay, occasionally I may also use this blog to share the craziness that is my life, but hey that is what will add some comedy to it :o) !

At any rate, I hope that you will jump onboard and follow me through all my crafty, crazy, adventures.